Wax carving and modeling
Almost every cast piece of jewelry begins as a piece of wax. It is carved, cleaned and refined until it is identical to the final jewel.
Types of wax #
- Hard (carving) wax: cut with files, saws and burs.
- Soft and modeling wax: heated and shaped with spatulas.
- Tubes and bars: for rings and basic forms.
How it is worked #
The design is marked, the block cut and filed, and wax is added with a heated spatula. The wax is weighed to calculate the metal needed.
Preparing the casting #
Sprues are attached to the model and mounted on a tree that goes into the casting flask.
Alternatives #
Models can also be 3D printed or CNC milled (3D printing).
Step by step #
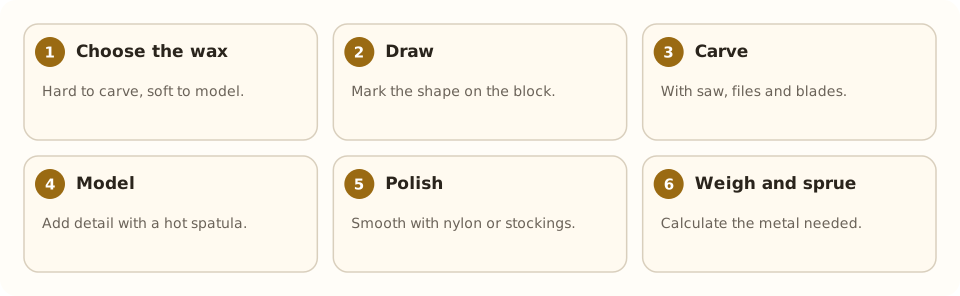
- Choose the wax. Hard to carve, soft to model.
- Draw. Mark the shape on the block.
- Carve. With saw, files and blades.
- Model. Add detail with a hot spatula.
- Polish. Smooth with nylon or stockings.
- Weigh and sprue. Calculate the metal needed.
Tools and materials #
Common mistakes #
- Very thin walls: the metal will not fill.
- Model with cracks.
- Forgetting sprues or placing them badly.
- Overheating the spatula.
See also #
This entry was drafted with the help of AI and is pending review by the author.
Related articles
 Techniques
Pavé setting
Pavé covers a metal surface with many small stones held by tiny beads of metal, as if “paved”; it gives continuous sparkle.
 Techniques
Burnishing: smoothing without removing metal
Burnishing smooths and shines metal by rubbing it with a polished steel tool, without removing material; used on bezels, prongs and as a final finish.
 Techniques
Metal clay (PMC)
Metal clay mixes silver or gold powder with a binder; it is hand-modeled and fired into solid metal. A modern, accessible technique.