3D printing in jewelry
3D printing takes a design on the computer to a physical model with an accuracy of tenths of a millimeter. In jewelry it is used for casting models and, more and more, for direct metal pieces.
Models for casting #
A resin printer (SLA or DLP) makes models with “castable” resins that burn out without residue in the mold. They are then cast like a wax model.
Direct metal #
Laser sintering (DMLS) builds pieces of silver, gold, steel or titanium layer by layer from metal powder.
Workflow #
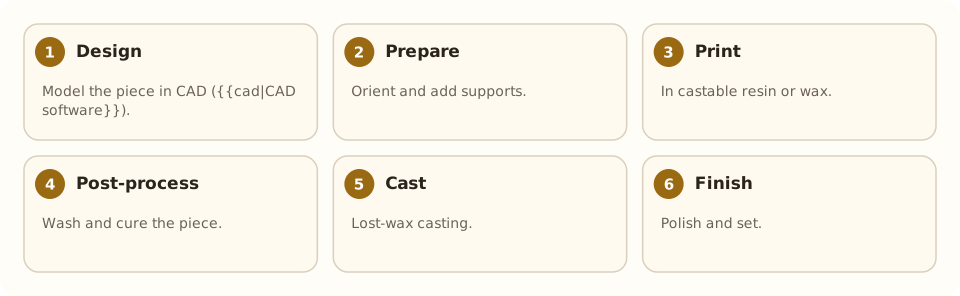
Design in CAD software, printing, curing, cleaning, casting and finishing.
Limits #
The size and cost of the machines, layer roughness, and finishing, which is still manual.
Step by step #
- Design. Model the piece in CAD (CAD software).
- Prepare. Orient and add supports.
- Print. In castable resin or wax.
- Post-process. Wash and cure the piece.
- Cast. Lost-wax casting.
- Finish. Polish and set.
Tools and materials #
- CAD software
- Resin or wax 3D printer
- Castable resin
- Burnout kiln
Common mistakes #
- Walls too thin to cast.
- Badly placed supports: marks.
- Resin poorly cured: leaves residue.
- Leaving no sprues.
See also #
This entry was drafted with the help of AI and is pending review by the author.
Related articles
 Techniques
Pavé setting
Pavé covers a metal surface with many small stones held by tiny beads of metal, as if “paved”; it gives continuous sparkle.
 Techniques
Burnishing: smoothing without removing metal
Burnishing smooths and shines metal by rubbing it with a polished steel tool, without removing material; used on bezels, prongs and as a final finish.
 Techniques
Metal clay (PMC)
Metal clay mixes silver or gold powder with a binder; it is hand-modeled and fired into solid metal. A modern, accessible technique.